Mobilum widget integration
The Mobilum widget is a highly customisable widget that handles any/or of the following:
User order where the user-specified what he wants to buy and optionally to what address
User management (login, forgot password etc.) and KYC
Card processing
Cryptocurrency delivery
Based on the requirements, the flow and screens will change accordingly and thus there might be two different ways of calling the widget: If Mobilum will handle the ordering process, where the user will inform us what he wants to buy then a call to the GetWidget must be made. On the other hand, if the partner will handle the order selection screens, then a call to the widget/GetWidgetWithOrderPrice or widget /GetWidgetWithOrderAmount must be made.
The following table explains, based on the scenario what to call:
Use-case |
Method |
|---|---|
Mobilum will handle order screen where a user can enter order details (amount, crypto currency etc.) |
|
Mobilum will handle only user and KYC aspects of the transaction |
|
Partner will send details (amount or price) and Mobilum will only extract payment from the card and inform of status |
|
Partner will send details (amount or price) and Mobilum will only extract payment from the card and inform of status |
|
Throughout the transaction process, the system will continuously update the price until the transaction is actually confirmed (card details are entered and executed). This is known as slippage and to minimize it the crypto-currency price will remain updated. If a call to the GetWidgetWithOrderPrice is made, the system will maintain the price constant (for example 250 USD) and update the quantity bought based on the latest price. On the other hand, if a call is made to GetWidgetWithOrderAmount then the system will maintain the crypto-currency amount (1 BTC) and update the price accordingly. If both price and amount are passed, the price will be used.
Basic setup - GetWidget
In this method, the system will display the order or login screen as the first screen. In order to integrate in such a scenario a call to https://api-dev.mobilum.com/widget/GetWidget (POST) must be made ensuring you set the following attribute in the header:
apiKey: { your API key }
Optionally the following parameters can be sent and they will set the widget with these properties
Parameter |
Type |
Description |
|---|---|---|
walletAddress |
string |
The destination wallet where funds will be transferred. |
cryptoCurrency |
string |
Ticker name for the crypto-currency (e.g., BTC, ETH). |
additionalData |
string |
When making any callback from the widget, the system will add this information. It can be used, for example, as a key between the order on Mobilum side and the partner system. |
fiatCurrency |
string |
The currency name (e.g., EUR, USD, CAD). |
fiatAmount |
decimal |
The price in FIAT currency to extract from the user’s card. |
amount |
decimal |
The amount of crypto-currency to deliver to the user. |
If the request was successful then a response similiar (not identical) to the below should be expected:
{
"redirectUrl": "Order",
"responseType": null,
"followUrl": null,
"success": true,
"result": {
    "widgetBase64Html": "PHN0eWxlIGlkPSdtb2JpbHVtLXdpZGdldC1jc3MnPjwvc3R5bGU+PGxpbmsgaHJlZj0naHR0cHM6Ly93aWRnZXQtZGV2Lm1vYmlsdW0uY29tL2Nzcy9hcHAuY3NzJyByZWw9J3N0eWxlc2hlZXQnPjxkaXYgaWQ9J21vYmlsdW0td2lkZ2V0JyAgZGF0YS1hcGlrZXk9JzE2REU5RjhCLUI0MTQtNEM1MC1CM0M4LUNGODM1NTY4M0E0Mic+PGRpdiBpZD0ndXNlclVVaWQnIHN0eWxlPSdk aXNwbGF5Om5vbmUnPjwvZGl2PjxkaXYgaWQ9J2NyeXB0b0N1cnJlbmN5JyBzdHlsZT0nZGlzcGxheTpub25lJz5FVEg8L2Rpdj48ZGl2IGlkPSd3YWxsZXRBZGRyZXNzJyBzdHlsZT0nZGlzcGxheTpub25lJz4weGI5M0UzNThFMDM3QjJGNTNEY0Q1MWM5NUMzNTQ4ZkM4OTRjNTdmQTE8L2Rpdj48ZGl2IGlkPSdhZGRpdGlvbmFsRGF0YScgc3R5bGU9J2Rpc3BsYXk6bm9uZSc+S2V5RnJvbVBhcnRuZXJTaXRlPC9kaXY+PGRpdiBpZD0nd2lkZ2V0VXVpZCcgc3R5bGU9J2Rpc3BsYXk6bm9uZSc+YmJiMWUwNmEtMzI1OS00YzdmLWFmMGMtZDIwZTc0ZDY3ZGU1PC9kaXY+PC9kaXY+PHNjcmlwdCBzcmM9J2h0dHBzOi8vd2lkZ2V0LWRldi5tb2JpbHVtLmNvbS9qcy9hcHAuanMnPjwvc2NyaXB0Pg==",
    "widgetBase64ScriptUrl": "aHR0cHM6Ly93aWRnZXQtZGV2Lm1vYmlsdW0uY29tL2pzL2FwcC5qcw==",
    "widgetBase64CssUrl": "aHR0cHM6Ly93aWRnZXQtZGV2Lm1vYmlsdW0uY29tL2Nzcy9hcHAuY3Nz",
    "User": {
    "userUuid": null,
    "token": null
    },
    "WidgetUuid": "024dce56-0a6e-45de-96b6-507a1c9b06e5"
},
"errors": []
}
In order to understand how to process the response, please go to the section. Processing the Response
Processing the response
The response is made up of the following important elements:
Element |
Description |
|---|---|
widgetBase64Html |
Contains the HTML for the whole page in base64 encoding, including the script and style URLs. |
widgetBase64ScriptUrl |
Contains only the script URL encoded in base64. |
widgetBase64CssUrl |
Contains only the script URL encoded in base64. |
Below is an example of a successful decoded form
// Inject the Mobilum widget CSS placeholder
const styleTag = document.createElement('style');
styleTag.id = 'mobilum-widget-css';
document.head.appendChild(styleTag);

// Load the Mobilum widget stylesheet
const linkTag = document.createElement('link');
linkTag.rel = 'stylesheet';
linkTag.href = 'https://widget-dev.mobilum.com/css/app.css';
document.head.appendChild(linkTag);

// Build the widget container
const widget = document.createElement('div');
widget.id = 'mobilum-widget';
widget.setAttribute('apikey', '***');

// Hidden inputs for widget configuration
const userUuid = document.createElement('div');
userUuid.id = 'userUUid';
userUuid.style.display = 'none';
widget.appendChild(userUuid);

const cryptoCurrency = document.createElement('div');
cryptoCurrency.id = 'cryptoCurrency';
cryptoCurrency.style.display = 'none';
cryptoCurrency.textContent = 'ETH';
widget.appendChild(cryptoCurrency);

const walletAddress = document.createElement('div');
walletAddress.id = 'walletAddress';
walletAddress.style.display = 'none';
walletAddress.textContent = '0xb93E358E037B2F53DcD51c95C3548fC894c57fA1';
widget.appendChild(walletAddress);

const additionalData = document.createElement('div');
additionalData.id = 'additionalData';
additionalData.style.display = 'none';
additionalData.textContent = '******';
widget.appendChild(additionalData);

const widgetUuid = document.createElement('div');
widgetUuid.id = 'widgetUuid';
widgetUuid.style.display = 'none';
widgetUuid.textContent = 'bbb1e06a-3259-4c7f-af0c-d20e74d67de5';
widget.appendChild(widgetUuid);

// Attach the widget to the page
document.body.appendChild(widget);

// Load the Mobilum widget script
const scriptTag = document.createElement('script');
scriptTag.src = 'https://widget-dev.mobilum.com/js/app.js';
document.body.appendChild(scriptTag);
In some languages, HTML containig <script> and <style> cannot be added directly in the body. In this case we provide seperate elements so they can be added in the <head> section while integration.
The final step is to inject the resultant HTML into an element and the widget should load accordingly. Below is an example of the layout once the widget has loaded although the actual layout can change.
Below is an example of the layout once the widget has loaded although the actual layout can change.
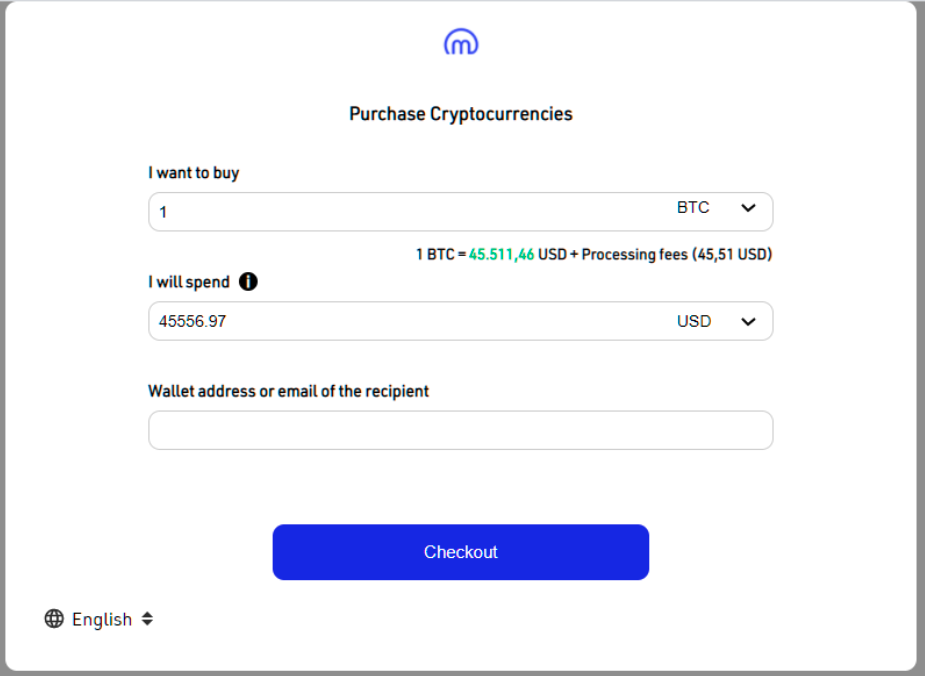
Example
Below is an example, using vanilla HTML and javascript to demonstrate the above. Adaptation of the below into any langugage should ba straightforward process. Please not that the functionality of the below is based on a specific scenario and might not work for the setup of your API key.
<head>
  <script>
    (function(){
      var data = {};
      var requestOptions = {
        method: 'POST',
        headers: {
          apiKey: '16de9f8b-b414-4c50-b3c8-cf8355683a42',
          'Content-Type': 'application/json',
        },
        body: JSON.stringify(data),
        params: {
          additionalData: ''
        }
      };
      fetch('https://api-dev.mobilum.com/widget/GetWidget', requestOptions)
        .then(response => response.json())
        .then(
          async (data = { result }) => {
            var element = document.getElementById('widgetContainer');
            if (element) {
              element.innerHTML = atob(data.result.widgetBase64Html);
              var script = document.createElement('script');
              script.async = true;
              script.src = atob(data.result.widgetBase64ScriptUrl);
              element.appendChild(script);
            }
          },
        );
    })();
  </script>
</head>
<body style="background-color:#d4e6f1">
  <div id="widgetContainer"></div>
</body>
Error Codes All error codes are handled directly by the widget and the appropriate error message is displayed to the client. The below list defines the low level error codes which are split into two: API level error codes and payment error codes.
Message |
Error Code |
|---|---|
Invalid username or password |
E001 |
Email already exist |
E002 |
Missing API key |
E007 |
3DS not supported by the card |
E013 |
User not found |
E014 |
Network error |
E020 |
Invalid currency |
E021 |
Invalid email provided |
E027 |
KYC process error |
E036 |
Unsupported currency pair |
E044 |
Region is blocked |
E050 |
Transaction rejected |
E0150 |
Transaction rejected, currency not supported |
E0151 |
Transaction rejected, issuer not supported |
E0152 |
Transaction declined, problem with MIP connection |
E0153 |
Failed to fetch transaction details |
E0154 |
Transaction not exist |
E0155 |
Transaction rejected, terminal not supported 3ds |
E0156 |
Transaction rejected, card not supported 3ds |
E0157 |
Transaction rejected, maximum transaction amount limit exceeded |
E0158 |
Transaction rejected. Data center card is expired. |
E01580 |
Transaction rejected. Not found Card Authentication (3DS 2.X) |
E01581 |
Transaction rejected. Card Authentication not match to transaction type (3DS 2.X) |
E01582 |
Transaction rejected, cof card not found in db |
E01590 |
Transaction rejected, initial cof transaction not approved |
E01591 |
Transaction rejected, recurring card not found in db |
E01592 |
Transaction rejected, initial recurring transaction not approved |
E01593 |
Transaction rejected, transactionXId parameter had registered for another transaction |
E01594 |
Transaction rejected, terminal blocks transactions with card issued in given card country |
E01596 |
Transaction rejected, 3DS version of terminal are not compatible with 3DS version defined in request |
E01597 |
Transaction rejected, ECI value is not available for card provider |
E01598 |
Transaction declined, processing timeout |
E01599 |
Transaction declined, 3DS 2.X flow invoked for other card number than specified in the request |
E01600 |
Transaction rejected, terminal is blocked for provider |
E01601 |
Installment Payment initial not found |
E05000 |
Installment Payment already confirmed |
E05001 |
Installment Payment already cancelleded |
E05002 |
Installment Payment already pay in full |
E05003 |
Installment Payment not confirmed in required time |
E05004 |
Installment Payment Initial was failed |
E05005 |
Installment Payment could not find valid installment plan for requested uuid |
E05006 |
Installment Payment Option not allowed for transaction |
E05007 |
Installment Payment missing plan uuid |
E05008 |
Installment Payment missing request number of installments |
E05009 |
Installment Payment requested number of installments is outside of allowed range |
E05010 |
Installment Payment operation not allowed, installment type allows ISSUER_FINANCED installments |
E05011 |
Installment Payment outside 3ds request is required for terminal |
E05014 |
Installment Payment unsupported card provider VISA |
E05015 |
Clearing of the payment is procesing |
E0170 |
Can’t clear payment |
E0171 |
Can’t clear payment, the time is over |
E0172 |
Payment is automatically cleared |
E0173 |
Payment is already cleared |
E0174 |
Can’t clear payment, clearing amount is to low |
E0175 |
Can’t clear payment, clearing amount is to high |
E0176 |
Reversal of the payment is procesing |
E0160 |
Can’t reversal payment |
E0161 |
Payment is already reversed |
E0162 |
Payment is already refunded |
E0163 |
Installment Payment reverse not allowed |
E05012 |
Refund rejected, no MC/VISA response |
E0180 |
Refund rejected by MC/VISA |
E0181 |
Refund transaction amount to low |
E0182 |
Refund transaction amount to high |
E0183 |
Transaction is refunded |
E0184 |
Transaction not cleared, can’t refund |
E0185 |
Refund is already processing |
E0186 |
Transaction is chargeback reported |
E0187 |
Installment Payment refund not allowed |
E05013 |
Transaction rejected, card is blocked |
E0200 |
Transaction rejected, bin is blocked |
E0201 |
Transaction rejected, terminal is blocked |
E0202 |
Transaction rejected, token is blocked |
E0203 |
Transaction rejected, user is on aml list |
E0204 |
Transaction rejected, bank is blocked |
E0205 |
Transaction rejected, to many reject transactions and card is blocked |
E0206 |
Error mpi V2 - failed internal |
E0300 |
Three DS Method Data mismatch |
E0301 |
Error on parsing Three DS Method Data |
E0302 |
Card number not Enrolled in 3DS v2 |
E0303 |
Invalid card authentication id |
E0304 |
Issuer card is not supported |
E0305 |
Invalid card number |
E0306 |
Card Authentication not found |
E0307 |
Terminal not exists |
E0132 |
Protocol version is not supported |
E0309 |
Invalid Three DS Method Data |
E0310 |
Mobilum widget WebHooks
Introduction
The widget is a self-contained process that runs on the server, with all information flowing directly from the client to the widget, bypassing the hosting site. Therefore, callbacks are the mechanism by which the widget communicates with the hosting site when a particular event has occurred.
Events
A callback is sent from the widget on the following events:
Login
Register
UpdatedKycStatus
UpdatedTransactionStatus
TransactionComplete
Although these events are supported, each API key can subscribe to one or more events. During setup, please inform our integration team which events you would _not_ like to subscribe to.
Security
There are 3 important security mechanisms employed by the system
1 There is no sensitive information passing through the callbacks, nor any information by which a user can be identified. The callbacks flow from one direction, that is from the widget to the endpoint URL. For example, the callbacks will send userUuid 123 successfully logged in but there is no way to know userUuid is loui mercieca.
2 All callbacks are post methods over HTTPS to ensure channel security
3 In the body of the callback there is signature field that ensures that the body has not been tampered with. The signature is generated as
follow:
a. Load the JSON body excluding the
signaturefield.b. Base64 encode the result of step 1.
c. MD5 hash the result of step 2.
The result should be compared with the signature field. If it matches that the body is in the original formal. If it doesn’t then the whole callback should be ignored.
Webhook body
The webhook body is made up of a standard response, containing 4 sections:
Section |
Description |
Notes |
|---|---|---|
General Information |
Contains generic information such as Action and ExternalIdentifier |
The ExternalIdentifier contains the same value passed inside the |
User |
Contains user-specific information such as status of KYC |
|
Order |
Contains information such as amount/price ordered and currencies |
|
Transaction |
Contains information about the transaction such as status |
During each phase of the order, one or more sections can be filled. For example, in the login action only the user information is present whereas after a transaction is complete all sections will be filled.
Please find below what sections are used for each action.
Action |
General Information |
User |
Order |
Transaction |
|---|---|---|---|---|
Login |
Yes |
Yes |
No |
No |
Register |
Yes |
Yes |
No |
No |
UpdatedKycStatus |
Yes |
Yes |
No |
No |
UpdatedTransactionStatus |
Yes |
Yes |
Yes |
Yes |
TransactionComplete |
Yes |
Yes |
Yes |
Yes |
The response object information can be found also at the (at the bottom of the page in the object called CallbackData) API documentation
Callback data
The following is an example of a complete callback
{
  "user": {
    "UserUUid": "d20ceaf6-8ef5-4acb-a2b0-2b6b7e8dc778",
    "KycComplete": true,
    "KycVerfied": true
  },
  "transaction": {
    "Uuid": "8252c1ce-5fb5-4dd3-a81d-5ee7ca81b238",
    "Status": "CLEARED",
    "Completed": true
  },
  "order": {
    "Uuid": "19e9b264-3ba1-445d-b655-df56d42e0542",
    "Crypto": "BTC",
    "Amount": "0.0061337000",
    "Currency": "USD",
    "QuotedPrice": "200.000000",
    "Wallet": "3FZbgi29cpjq2GjdwV8eyHuJJnkLtktZc5",
    "Fee": {
      "Id": 1906,
      "FlatRate": 0,
      "CommissionAmount": 0.2,
      "CommissionRate": 0.1,
      "Margin": 0.2
    }
  },
  "Action": "TransactionComplete",
  "ApiKey": "16de9f8b-b414-4c50-b3c8-cf8355683a42",
  "ExternalIdentifier": "",
  "Signiture": "F2B807D9352718E7738A30EBE9FA8ACD"
}
Mobilum widget UI/UX modifications
Default CSS
Widget is delivered with default CSS and can be displayed without any design work required. But it is possible to upload modified CSS to change widget look and feel (see Mobilum widget integration).
Widget layout is made to be responsive to adapt screen width. Breaking points, when layout changes are < 500px, 500px - 766px, 767px <. Although any CSS can be adjusted to fit your design, it’s highly unrecommended to change the general layout and structure of elements, as it can give unexpected results in different resolutions.
When widget is injected in site, your custom CSS is placed in an element with an ID “ “. Keep in mind, that rest of the mobilum-widget-css widget, together with its own default CSS, is placed after that element, which means, that if you have your own custom CSS selector, which matches selector in widget default CSS, your style will be overridden.
To make sure that your custom CSS is given a priority when browser renders the content, you can either use your selector to be more precise in terms of targeting an element, than selector in widget CSS. For example:
Widget CSS:
.MBMWidget_title {
  font-size: 16px;
}
Your CSS:
.MBMWidget_General .MBMWidget_title {
  font-size: 18px;
}
Whole widget is wrapped in a DIV element with a class “MBMWidget_General”, you can use that to target any element more specifically in the scope of whole widget. Each separate page in the widget then is wrapped inside DIV with unique class name starting with “MBMWidget_” + page name, for example “MBMWidget_Login”, “MBMWidget_Register” etc. Use those if you wish to style any element only for one page.
Updated CSS version 1
This modification is very simple. It changes colors and size of some elements.
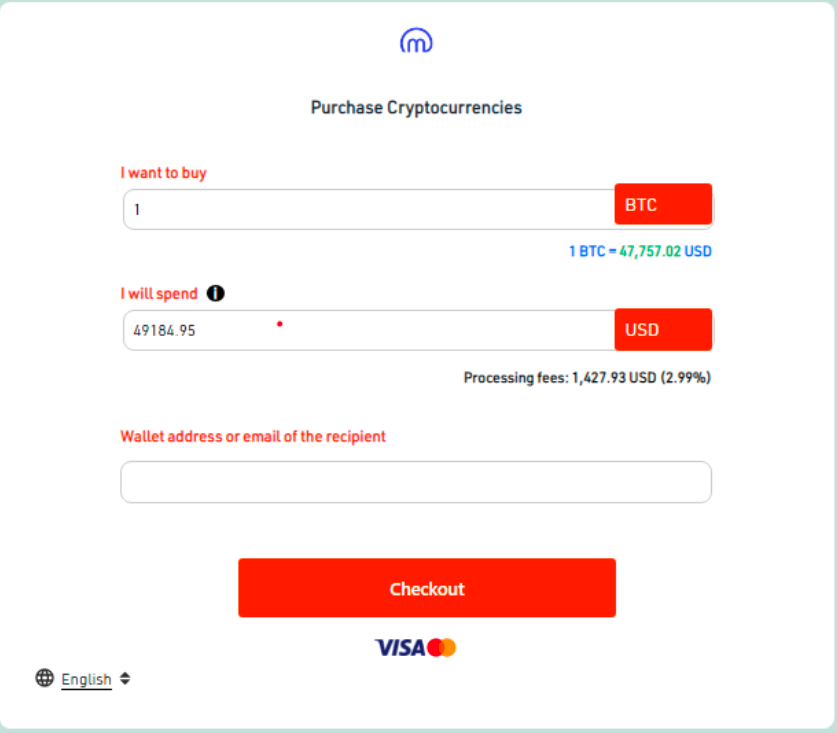
CSS modifications shown below.
button.MBMWidget_GeneralButton.MBMWidget_full-width.MBMWidget_Exchange_ButtonCheckout.MBMWidget_defaultAppButton {
  height: 40px;
  outline-width: 0;
  border-width: 0;
  border-radius: 4px;
  transition: .5s;
  color: #fff;
  font-size: 16px;
  font-weight: 500;
  background-color: #ff4000 !important;
  padding: 7px 10px !important;
}

.MBMWidget_GeneralInput input {
  height: 36px !important;
}

.MBMWidget_Exchange_form label {
  color: #ff4000 !important;
}

select.MBMWidget_my-2.MBMWidget_full-width {
  width: 80px;
  border-color: #ff4000 !important;
  color: #fff;
  outline-width: 1px !important;
  height: 38px !important;
  font-size: 16px !important;
  font-weight: 500 !important;
  border-radius: 4px !important;
  outline-color: #ff4000 !important;
  background-color: #ff4000 !important;
  padding: 0 0 0 9px !important;
  margin: 0 !important;
}
Updated CSS version 2
CSS update can change shape of the form fields.
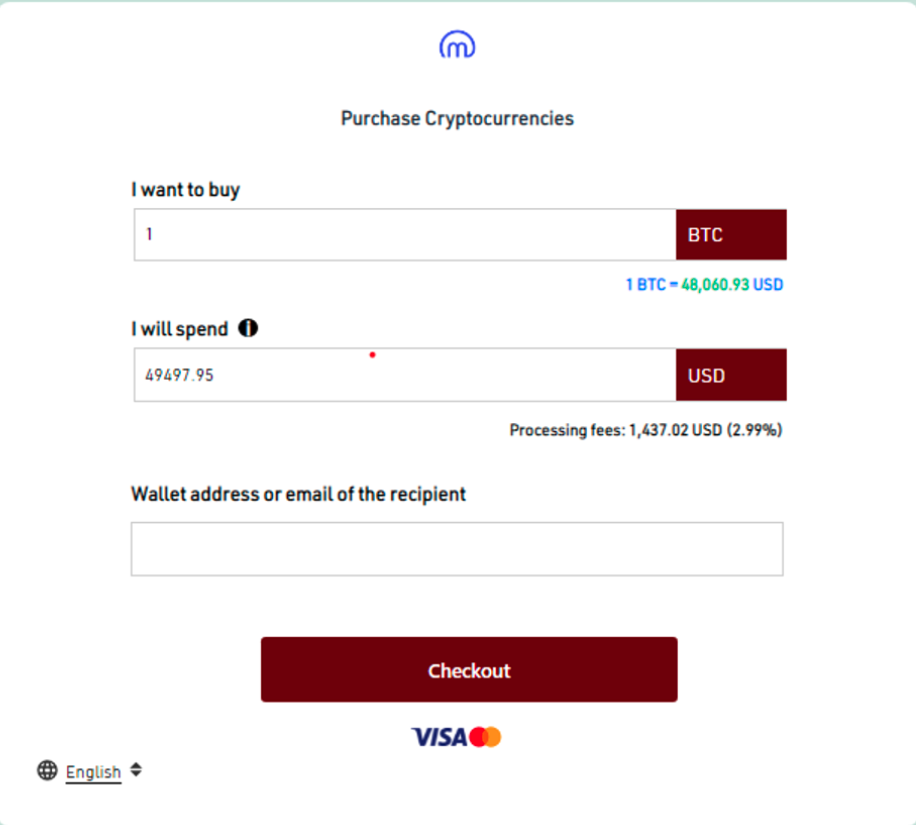
CSS modifications shown below.
.MBMWidget_GeneralInput input {
  height: 42px!important;
  border-radius: 0px!important;
}
.MBMWidget_Exchange_form label {
  color: black!important;
  font-size: 16px!important;
}
select.MBMWidget_my-2.MBMWidget_full-width {
  width: 82px;
  border-color: #6b0606!important;
  color: #fff;
  outline-width: 1px!important;
  height: 42px!important;
  font-size: 16px!important;
  font-weight: 500!important;
  border-radius: 0px!important;
  outline-color: #6b0606!important;
  background-color: #6b0606!important;
  padding: 0px 0px 0px 9px!important;
  margin: 0px!important;
}
button.MBMWidget_GeneralButton.MBMWidget_full-width.MBMWidget_Exchange_ButtonCheckout.MBMWidget_defaultAppButton {
  background-color: #6b0606!important;
}
.MBMWidget_GeneralInput input:focus {
  box-shadow: 0 0 0 1px lightgrey;
  border-color: lightgray!important;
  outline: 0px!important;
  border: 1px solid lightgray!important;
}
.MBMWidget_Exchange_General .MBMWidget_GeneralSelect select option {
  background-color: white;
  color: black;
}
Updated CSS version 3
Background of the widget can be changed too.
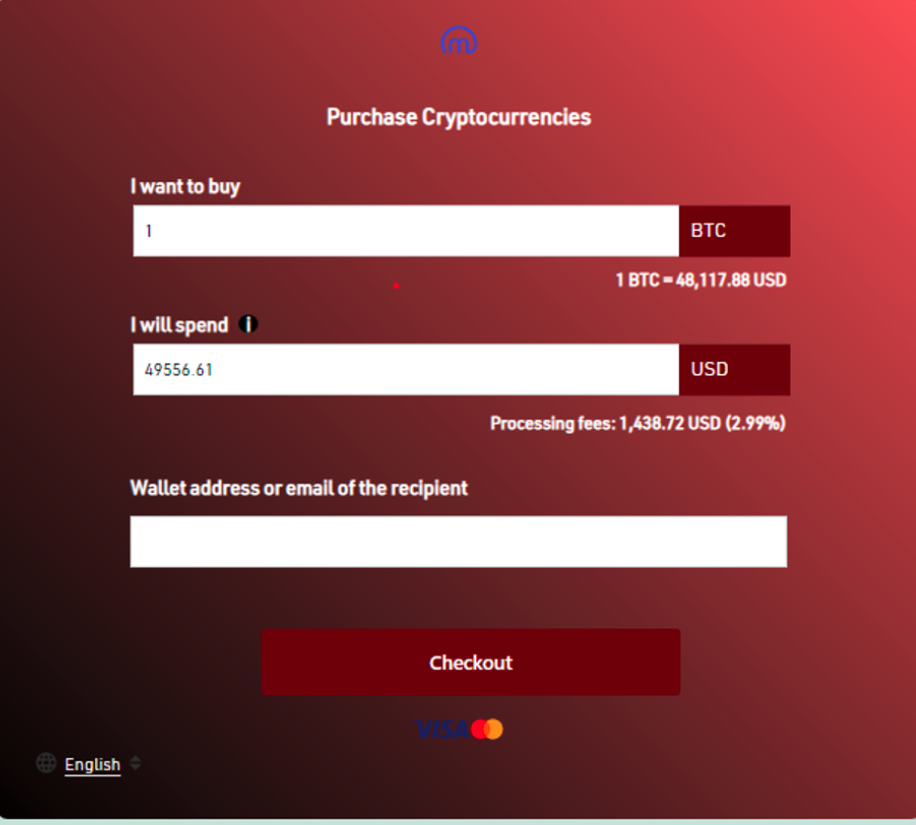
CSS modifications shown below.
.MBMWidget_General {
  background: linear-gradient(45deg, black, #f30c0c9e)!important;
}

.MBMWidget_title {
  font-size: 18px!important;
  color: white!important;
}

.MBMWidget_Exchange_form label {
  color: white!important;
  font-size: 16px!important;
}

.MBMWidget_Exchange_preview span {
  font-size: 14px!important;
  color: white!important;
}

span.MBMWidget_Exchange_FormExchangeSelectedCryptoCurrency.MBMWidget_btc_green {
  color: white!important;
}

.MBMWidget_General a {
  color: white!important;
}

.MBMWidget_Exchange_General .MBMWidget_Verify_customSelect {
  position: absolute;
  right: 25px;
  bottom: unset!important;
  transform: translateY(34px)!important;
}

select.MBMWidget_my-2.MBMWidget_full-width {
  width: 82px;
  border-color: #6b0606!important;
  color: #fff;
  outline-width: 1px!important;
  height: 42px!important;
  font-size: 16px!important;
  font-weight: 500!important;
  border-radius: 0px!important;
  outline-color: #6b0606!important;
  background-color: #6b0606!important;
  padding: 0px 0px 0px 9px!important;
  margin: 0px!important;
}

.MBMWidget_GeneralInput input {
  height: 40px!important;
  border-radius: 0px!important;
}

button.MBMWidget_GeneralButton.MBMWidget_full-width.MBMWidget_Exchange_ButtonCheckout.MBMWidget_defaultAppButton {
  background-color: #6b0606!important;
}

.MBMWidget_GeneralInput input:focus {
  box-shadow: 0 0 0 1px lightgrey;
  border-color: lightgray!important;
  outline: 0px!important;
  border: 1px solid lightgray!important;
}

.MBMWidget_Exchange_General .MBMWidget_GeneralSelect select option {
  background-color: white;
  color: black;
}
Widget integrations as standalone KYC service
Following are instructions and examples, how to create Widget integration, which would work as standalone KYC verification system in other projects.
Prerequisite:
Site has to be created in database with “FirstPage” set to “PerformKYC” and “KycProvider” to “NULL”
When site is created, Widget has to be called with endpoint, containing data about the user, to whom the KYC will be performed. GetWidget() In request body, following user fields are required:
{
  "Email": "string",
  "Name": "string",
  "Surname": "string",
  "Password": "string (MD5 hash)"
}
Response should contain newly created user UUID, by whom the further status of KYC process can be checked:
{
  "result": {
    "User": {
      "userUuid": "string"
    }
  }
}
Checking status
GET GetUserKycCompletedStatus(string userUUid)
Returns true/false if user has completed KYC (regardless of the result).
GET GetUserKycVerifiedStatus(string userUUid)
Returns true/false if user has completed KYC and has been verified.
If user has completed KYC, but is not verified, there is still a chance, that the process can be repeated in the same session and status can change. For example, blurry photo of ID document can be fixed by resubmitting a new photo in the same session.
Full example of such integration:
<head>
  <script>
    (function(){
      var data = {
        Email: '[email protected]',
        Name: 'Name',
        Surname: 'Surname',
        Password: 'f9227cc1d2ea2ddf8e1435942a610380'
      };
      var requestOptions = {
        method: 'POST',
        headers: {
          apiKey: 'YOUR-API-KEY',
          'Content-Type': 'application/json',
        },
        body: JSON.stringify(data)
      };
      fetch('https://api-dev.mobilum.com/widget/GetWidget', requestOptions)
        .then(response => response.json())
        .then(async (data = { result }) => {
          var element = document.getElementById('widgetContainer');
          if (element) {
            element.innerHTML = atob(data.result.widgetBase64Html);
            var script = document.createElement('script');
            script.async = true;
            script.src = atob(data.result.widgetBase64ScriptUrl);
            element.appendChild(script);
          }
        });
    })();
  </script>
</head>
<body>
  <div id="widgetContainer"></div>
</body>